Vue JS is a JavaScript front-end framework that allows you to build Single-Page Applications (or SPA). It was developed by Evan You and was initially released in 2014. It is less than 40 KB of size and is very fast. It is also very easy to use in any type of application, whether it is an interactive blog, or a complete management system.
In this article, we will go through the basic usage of Vue JS and how to use it in a basic HTML file, then I will list some resources to help you learn more about it.
We will begin by setting it up in a simple HTML website, then how to use data and manipulate it, as well as manipulating the HTML view, and a bunch of its built-in features. We will be using the “Quick Start Guide” section from the official Vue JS Documentation. Let us begin!
Prerequisites #
- At least know the basics of JavaScript, including
if elseandloops
Setting It Up #
First, create a folder for the tutorial, I personally called it vue_js_tutorial. Then inside that folder, create a file called index.html which will contain the main Vue JS code which will instantiate the application, as well as the HTML code.
Inside that file, add the following:
<script src="https://unpkg.com/vue@3/dist/vue.global.js"></script>
<div id="app">{{ message }}</div>
<script>
const { createApp, ref } = Vue
createApp({
setup() {
const message = ref('Hello World!')
return {
message
}
}
}).mount('#app')
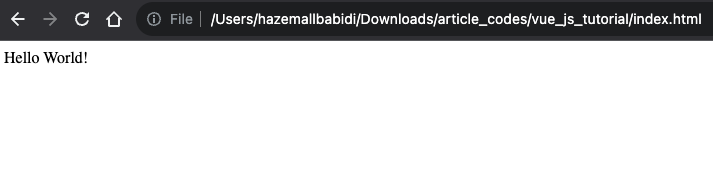
</script>Copy the full path of your HTML file, and run it in the browser, it should look something like this:
Let us go through the file:
- The first line:
<script ...>- This line pulls the Vue JS file from a global CDN. It allows us to use the Vue JS functionality without actually downloading or installing anything.
- The second line:
<div id="app">...- This line is where the functionality of our Vue app is actually created, it is a normal HTML
divwith theidofapp. We will see why we need to add thisidnext.
- This line is where the functionality of our Vue app is actually created, it is a normal HTML
- The final chunk of code:
<script>...- This is a simple JavaScript tag where we will inject JS code directly into the HTML
- We first import the necessary functions,
createAppandreffromVuewhich is pulled from the CDN file. - Next, we used the function
createAppto actually create the Vue app, inside this function, we usedsetup()to add the necessary data which will be used in the application. - Inside the
setup(), we are returning a message to be used in the HTML. - Notice that the message is used in a function
ref(...), this function is built-into Vue and it allows the value to be referrenced inside the HTML. - After we are done with that, we mounted the application on an HTML tag with the
idofapp, as done here:.mount("#app"). - Now we can use the values inside the HTML after this.
If you noticed inside the <div id="app" we have {{ message }}, this is how we display Vue JS, we will go into more detail next.
Data Display & Manipulation #
Just like we saw above, we can display the Vue data using the curly braces like so {{ message }}.
Let us try something else now.
We will change the variable name from message to name and make it empty by default:
setup() {
const name = ref('')
return {
name
}
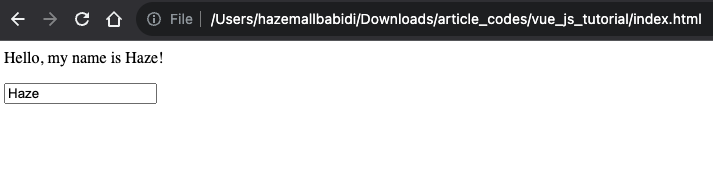
}Now we can change the HTML, change the div content to look like this:
<div id="app">
    <p>Hello, my name is {{ name }}!</p>
    <input v-model="name" type="text">
</div>
We added a p tag which contains some text, as well as the variable name. We also added an input tag below which has an attribute called v-model and it has the value name. This attribute allows us to change the value of the variable name through the input.
v-model basically allows us to manipulate a value that was injected into the Vue app, the value of that attribute, which is name in our case, is the name of the variable we injected into the Vue JS part of the file.
Go back to the browser and refresh the page, you should get something like this:
Try to change the input box and see what happens.
If it worked well, then welcome to the world of SPAs!
What happened was we allowed Vue to change the value of the name variable using the input box, which has the attribute v-model linking to the original variable name.
If and Else #
Sometimes, we might want to show a message if a condition is met, otherwise we might want to show something else.
We can do that with the attributes v-if and (optionally) v-else (or v-else-if) in Vue JS. Let us try it out.
Change the Vue JS setup() to include a number variable:
setup() {
      const number = ref(0)
      return {
        number
      }
}
Next, we will change the HTML div to look like this:
<div id="app">
    <p>What is 2+3?</p>
    <input v-model="number" type="number">
    <p v-if="number == 5">Correct!</p>
    <p v-else>Wrong!</p>
</div>
We asked what 2+3 is equal to and allowed the user to input a value. Below the input box, we check if the inserted value is correct and display the message Correct!, like this:
<p v-if="number == 5">Correct!</p>Else, if the value is incorrect, we display the message Wrong!:
<p v-else>Wrong!</p>That is how simple ifs and elses are in Vue JS!
Loops #
Vue allows you to loop through an array using the attribute v-for, it allows you to access each value from that array, similar to a foreach function. Let us try it out.
In the Vue JS setup(), we will inject an array of objects for the users, which consist of the user’s name and age:
setup() {
      const users = ref([
        { name: "Hazem", age: 24 },
        { name: "John", age: 32 },
        { name: "Jane", age: 28 }
      ])
      return {
        users
      }
}
We simply changed the variable name, and assigned an array of objects to that variable, as shown above.
The HTML div should look like this:
<div id="app">
    <p v-for="user in users" :key="user.name">
        {{ user.name }} is {{ user.age }} years old.
    </p>
</div>
In the code above, we are simply iterating through the array of objects:
<p v-for="user in users" :key="user.name">Note: the key attribute is important in order for the loop to work properly
Then we use the value of the current iteration as the message:
{{ user.name }} is {{ user.age }} years old.If we open the browser and refresh, we should see the message above written for each of the users.
Conclusion #
Vue JS is a minimalistic, yet powerful, front-end JavaScript framework. I personally use it in almost all of my projects. It has fulfilled my requirements in every aspect, whether I was working on a landing page, or a complete management system.
Thank you for reading the article. I hope you learned about Vue JS, and I am excited to know what projects you built using this awesome framework. See you in the next article!